YS 4-Stroke Facts Page
Updated 9/10/98
The following information is based on a Q&A sessions with Rick
Mattie at the 1996 and 1998 Nationals. If you go to the Nats, you will
find Rick's clinic to be one of the more popular events. This year he gave
out some really nice YS decal sheets.
These notes are correct to the best of my knowledge. Any advise here is
to be taken at your own risk, but you can contact Rick directly to verify
any rumors read here. Many thanks to Rick for his help at the Nats! Here's
a photo of him in Muncie in 1996 with his YS140 powered Ariel: 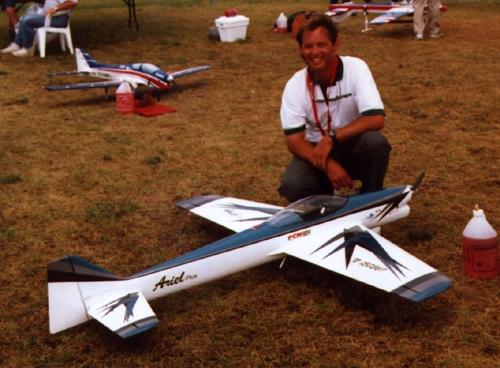
YS four-strokes general information
1. Replacing rings
a) look for wear spots or dark spots on liner,
especially at top. This indicates need to replace ring
and liner.
b) Do not expand ring over end of piston. Slide end
into slot and rotate into place.
2. Recommended fuel
a) 15 to 20% nitro and 20% oil by volume.
b) Rick uses 100% synthetic, but says 18% synthetic
and 2% castor is also a good mix.
c) YS 20/20 Powermaster.
3. Removal of bearings
a) Put screws into backplate holes. This is so that
when you rap out the bearings you won't distort the
crankcase.
b) Heat engine gently in oven to about 200 degrees F.
c) Tap crankcase on block of wood. Bearing should
drop out easily.
4. Installing bearings
a) Slide bearing onto crankshaft.
b) Heat case gently in oven to about 200 degrees F.
c) Push in front bearing.
d) Slide in crank-bearing assembly.
e) Use prop, thrust washer, prop nut, washer, etc. to
pull into place.
f) Option: bearings may be placed in freezer before
assembly.
5. Cam
a) Drive washer mark is 5 degrees before TDC. Use
this mark, not actual TDC.
b) Alignment mark on cam will be approximately at
the 12:00 to 12:30 position when thrust
washer mark is straight up. Refer to figure 1.
c) There is no timing mark on the new sealed drive
washers. Use an old drive washer to set
timing and then change to the sealed drive
washer.
6.Initial settings: a) Low end needle 2.5 turns out from full in (91 and
SC only)
b) Regulator flush
c) High end needle 1.5 turns out.
7. Tanks:
a) Watch for leaks, especially ones that only appear
under full pressure. This can cause surging and is
especially problematic with the SC.
b) Rick recommends replacement every 150 flights.
8. Surging: Could be worn out piston. Piston life is about 200
flights.
9. Regulator tab goes forward.
10. Always replace all gaskets upon re-assembly. Possible
exception to this rule: valve cover.
11. Regulator edge may cut diaphragm. Knock the edge off this
or return to Futaba.
12. Replace head gasket if burn ring visible. Okay to keep if
clean.
13. Regulator springs. Some straight springs (not cone shaped)
got out in some SF's and AC's. They work okay, but are about
twice the sensitivity.
14. Cleaning. Use soap and water or methanol. DO NOT USE
GASOLINE! Ultrasonic cleaning recommended.
15. Valve wear. Inspect valve for wear in area shown in figure
2. Metal will cup out with time (or if valve adjusted too loose)
and result in a weak corner. Corner will then break off. This
occurs more oftern with exhaust valves and usually after
hundres of runs. Adjust valves cold. Rick Mattie says he checks
his valves at 5, 10 and 20 flights and simply goes by feel-
doesn't use feeler gauges.
16. C-clips wear excessively if not adjusted correctly. Replace
every 150 flights. When adjusting valves, it is best to adjust on
the tight side.
17. Rocker arms: inspect for cupping where it touches valve
stem. See figure 3. With time end of rocker can fail.
18. Valve seats. Grinding these is risky, but if you must try it,
use Gentle Scrub bathroom cleaner and spin the valve in a
Dremel tool.. Check for leaks by putting a bit of oil around the
top of seated valve and running motor thru compression.
Bubbles will indicate leaking.
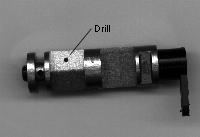
19. Loading up on low end (applies to 120SF, NC, AC).
a) Don't overadjust regulator to the lean side.
Regulator should function within one turn of flush. If
engine needs to be leaned the hole in the butterfly
valve (see figure 4) may be drilled out as
much as 1/16 inch.
b) Check dipharagm.
20. Never use petroleum-based after-run oil. Klotz okay.
21. Plugs. Use OS F only.
YS91
1.Initial settings:
a) Low end needle 2.5 turns out from full in
b) Regulator flush
c) High end needle 1.5 turns out. Note that this engine
richens slightly after it warms up. Do not re-peak
when this happens as it will begin to lean as it heats
further.
2. Recommended RPM: 9200 max.
3. Loss of power when heats up: may be loose liner- send back
to Futaba.
4. Can't shut off or can't set top end needle:
a)Look for vacuum leak in valve cover. Could be
gasket or ground off head.
5. Loss of power:
a) Ring
b) Rear bearing. Should be replaced every 150 flights.
6. Recommended prop: 14x10
YS120SC
1.Initial settings:
a) Low end needle 2.5 turns out from full in
b) Regulator flush
c) High end needle 1.5 turns out.
2. Removing the black throttle barrel seal:
a) Always leave in retainer screw.
b) Remove arm.
c) Pull barrel out the needle valve side. ALWAYS!
d) After replacing seal, reverse procedure to
reassemble. Insert needle valve side. Use blade of
screwdriver to coax seal into place as required.
3. Problem: throttle barrel sticks. Try loosening two top screws
on throttle body. They may have been overtorqued.
4. Removal of crankshaft.
a) Note that ridge in case will catch ring around back
of crank if not positioned correctly. Begin removal
by pushing back shaft until limit is hit (resistance is felt).
b) Rotate ring until split is straight down.
c) Compress ring with screwdriver and push out
crank. If needed, rest case on wood, put nut on end of
crank and give it a light tap with hammer.
5. Rods
a) Damage usually caused by high nitro and heavy
prop.
b) The SC likes to be run at a higher RPM than the
AC. Rick's SC ran about 7500 with a 16.5x12 on 20%.
6: Piston: New low compression piston with a dished top is
now available for USA use. This is to be run with only one
head shim. The Japanese typically run lower nitro and more
RPM. Rick recommends trying the 15x12 narrow and shoot
for about 7800 to 8000 RPM.
7. Vibration: expect more with the SC.
8. Product life: SC is to be discontinued and replaced with the
140. Parts for the SC will be available for some time.
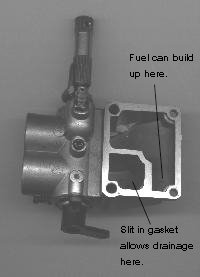
9. Slit in plastic backplate gasket. It was discovered in side
mounted engines that a glob of fuel collects in the area shown
in figure 5. The cut allows this to drain as shown. Problem also
appears in rolls or sometimes in vertical flight.
10. Brass ballast in regulator. Early tests indicated a problem
when entering the top of an hourglass due to fuel starvation.
The mass of the ballast helps hold regulator open during this
maneuver.
11. Screw in backplate. The same casting is used with the 140.
For the 140, the screw is replaced with a nipple that is teed to
the return to supply additional tank pressure.
12. Fuel spitting out of the carb when idling is normal. Air
cleaner available at Radio South will help alleviate this.
13. Recommended RPM: 9000 max.
14. Can't shut off or can't set top end needle:
a)Look for vacuum leak in valve cover. Could be
gasket or ground off head.
YS120NC
1. Use: This is a sunday-flyer sport design and not intended for
competitive use.
2 Prop recommendation: 16x8 or 15x10.
3. Brass ballast in regulator. Early tests indicated a problem
when entering the top of an hourglass due to fuel starvation.
The mass of the ballast helps hold regulator open during this
maneuver.
4. Fuel spitting out of the carb when idling is normal. Air
cleaner available at Radio South will help alleviate this.
5. Recommended RPM: 9000 max.
YS120SF
1. Recommended RPM: 9000 max.
YS120AC
1. Recommended RPM: 9000 max.
2. Replace piston with standard piston (YS0600) and use one
extra head shim.
3. Slow response to throttle or goes to low, then high RPM:
Piston worn out and getting blow-by.
4. Watch out for gasket on air chamber to get sucked in. Use
original paper gasket and check tightness of screws often.
5. Aftermarket gaskets okay on regulator, but paper will work if
you are sure to purge regulator screw holes of oil before
reassembly.
YS140
1. Availability: due out at the end of the year for about the
same price as the SC. It is 10gm. lighter than the SC and shares
many parts.
2. Prop: try 16.5x13.5. Don't over-nitro!
1998 additions and updates:
*Rick showed off a proto of a new integral YS140 soft motor mount. Unfortunately,
Bill Lairsey's camera jammed and he exposed all the photos he took at the
Nats, so my sketches will have to suffice:
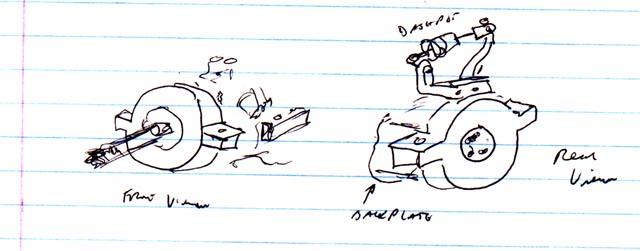
As you can see (I hope), the usual mounting ears for the engine are
not used. Instead, the front is supported by an aluminum ring with a soft
center enveloping the front bearing area. The rear is similar, but bolted
into the backplate somehow. A heavy dashpot that looks like a model car
shock absorber is supported between arms attached to the engine rear and
rear mount. Photos can be found at My
Hobby's R/C Airplane.
*The YS160 will never be produced, however, expect new versions of
the YS140.
*The inability to shut down your engine is a symptom of air leaking through
either the head gasket or pushrod guide o-rings.
*The YS140 has no timing marks.
*Setting valves: Rotate crank to TDC. Note that at TDC, wiggling the crank
back and forth 15 degrees or so will not cause the valves to move. Set
valves to about .002 inches. A good rule of thumb to obtain this is to
bottom out the adjustment screw, then back it off just under 1/4 turn.
Keeping your valves fairly tight like this will reduce wear.
*Note that the fuel injection system only injects fuel at speeds exceeding
2000 RPM. Below this, fuel is inducted in the normal manner. This is valuable
information for troubleshooting!
*When removing the butterfly valve from the carb of a 120SC, 91, or 140,
do so from the needle valve side of the engine. When re-inserting, carefully
press down the o-ring using a jeweler's screwdriver. Note that the o-ring
is tapered and the wide part goes on the inner side of the butterfly.
*Small bubbles in the regulator line are normal at idle and typically go
away at higher throttle settings. Bigger bubbles are symptomatic of diaphragm
or regulator gasket problems.
*Setting up a 140:
1. Always set up the top end first and see that it runs consistently there.
2. Go to a 2000 RPM idle. If the RPM slowly goes down, then the
low end needle is set rich.
3. Set the low end needle so that there is about a two second delay in
transition to full throttle due to richness. Engine should not immediately
bang to top end.
4.Set the Regulator at 3000-4000 RPM. If speed slowly drops in this range,
then the regulator is rich and needs to be leaned.
*Breaking in the 140:
Rick runs about 10 ounces of fuel through the engine and then puts it into
the plane. Use a prop that maybe runs in the 8200 to 8300 range. Rick runs
his around 8900.
*Note that the low end needle is an airbleed type and its action has limited
after about about 4 & 1/2 turns out.
*Note that the rotor screw is a backward thread. Upon reassembly, use a
dab of green Locktite on it. It's okay to bottom this screw out.
*YS claims that the rear nipple in the 140 backplateis a bleed that
helps keep the regulator open longer than the connection used in previous
engines.
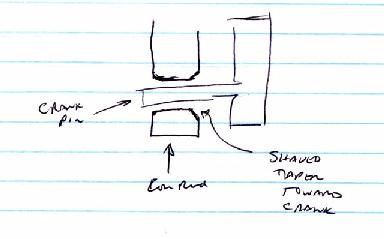
*Conrods are not symetrical. The hole for the crankpin has a wider taper
on the crankshaft side. See ugly sketch below.
*Crank removal. REMOVE CAM FIRST! Screw nut set onto very end
of crank and give it a love tap with a mallet.
*Bearings It they don't pull right out, then heat the case in the oven
at 200 degrees F. (or up to 275 if stubborn). Remove the nipples before
doing this or their seals will melt.
Geoff Combs showed off a dandy set of bearing pullers for all types of
YS four stroke bearings. They are a slick item and a steal at $20. Contact
Geoff at 614.577.0265.
*Valves:
1. Rick has found that a good valve cleaner is commercial automotive brake
spray.
2. To check for stem or guide wear, wiggle the valve in all axes in the
near-closed position.
3. Inserting the spring retainer clips:Press on the valve face with your
finger while holding the spring and retainer disc down with your thumbnail.
Insert the first retainer. Slightly release the pressure on the spring
until the disc jams the first retainer in position at an angle. Insert
the second retainer.

Return to GROTTO 2 pattern page.
Note: If you have any suggestions or comments regarding GROTTO
2 please write the
Keeper of this Web Page